Month: December 2016

Using PostMan to call the SOAP version of Catalina API for Dynamics SL

Using PostMan to call the SOAP version of Catalina API for Dynamics SL

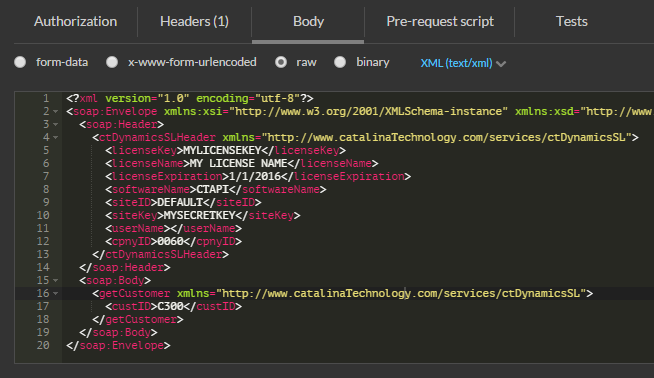
Often, when you are writing code to integrate your app or web solution to Dynamics SL using Catalina’s SOAP version of their API, you may not want to spend the time to write a client to do this.  The RESTful version of the API is pretty straight forward.  But what if you want to do this with SOAP?  Normally you would have to write .NET or PHP code to do all the work to send the data.  But Postman can do this quite nicely without having to write any code.

PostMan

PostMan is a tool that allows you to send data to a server and get a response.  It is normally used in testing and interfacing with RESTful API, but is pretty easy to use for SOAP as well.

You can download Postman here:  https://www.getpostman.com/  (NOTE:  this works with Google Chrome, so Chrome will be required as well.  This will work on all of your favorite OS platforms – Windows, Mac, Linux, etc.)


PostMan works on the following:  Continue reading “Using PostMan to call the SOAP version of Catalina API for Dynamics SL”

Testing PH/Temperature sensor

Testing PH/Temperature sensor

I have progressed on my PH sensor project.  I have added temperature sensors (Dallas DS18B20) to measure air-temp and water-temp to augment the PH sensor.  Next will be the addition of O2 absorption as well.
I am using the following:

  1. ESP8266 wifi board (for the microcontroller)
  2. 1x DS18B20 temperature sensor that is water proof for watertemp
  3. 1x DS18B20 temperature sensor that is going to be soldered to the project board for airtemp
  4. 1x ADS1115 16bit ADC to convert the analog signal from the PH sensor to digital
  5. 1x DC to DC voltage converter to handle the required 5v for the PH sensor (the ESP8266 is 3.3v)
  6. 1x 5v Analog PH Sensor
  7. Visual Micro (yes, I am a visual studio user.  and I find that visual micro gives me much more than the Arduino IDE)

You can see the device at work.  NOTE the PH of the water is very acidic.  This is due to the fact that we had a lot of rain.  I have to get the PH back up to about 6 for the lettuce to be happy.

After weatherproofing and hardening our prototype, we are then looking at feeding the data to an Azure IoT hub which we can then route that data to helpdesk, CRM, and field service systems for dispatching technicians to remedy any problems that could occur.  As well as have data for BI reporting.  Our integration tools for this type of thing can be seen at www.catalinatechnology.com

Azure Event Hub to Adafruit Bridge

Ok, this might be a round about way to do something, but I really wanted to experiment with MQTT and Azure Event Hubs.  I wrote a bridge that would bridge data between several MQTT brokers and then queue that data up on an Azure Event Hub.  These MQTT brokers are fed by data from several ESP8266 boards reporting different environmental conditions (temperature, etc).

After I got the MQTT to Azure Event Hub bridge done, I then found Adafruit’s io.adafruit.com dashboarding service (http://io.adafruit.com).  It is pretty cool.  So, what I then wanted to do is write a bridge between my Azure Event Hub to Adafruit to show data on a dashboard.

1. Creating my MQTT listener to bridge data to Azure

Continue reading “Azure Event Hub to Adafruit Bridge”

Catalina API for Dynamics SL Videos

We have a few videos that we have recently published here:

https://www.youtube.com/playlist?list=PLo865BZ7uzLajkQAs0DLn4IOE1xKdTKNw

We have several examples on how to setup our SOAP based API in Visual Studio.  As well as some basic calls that will help you get started.

You can get more information from the Catalina Website: www.catalinatechnology.com

Our Hydroponics Design

Overview

Below are some simple plans on how we build our tower structures for our back-yard hydroponics.  We have 2 of these.  This is the smaller one. 

  1. The structure is constructed of 2×4 lumber
  2. It uses a 6′ fence post for hanging the towers from
  3. We also are using a plastic tub (purchased from Target) for the water reservoir
  4. The towers drain into a vinyl rain gutter which has a downspout in the middle, over the reservoir
  5. We are using 2” flexible tubing that carries the water pushed from the pump, up the structure and is then zip-tied under the length of the 6’ fence post.  Note, you will need to make sure that the end (not attached to the pump) is crimped closed Link to tubing on Amazon
  6. Use an ice pick to poke a hole in the ½” tubing to where you want your ¼” tube to drip down into your towers

https://www.amazon.com/Genova-Products-912051-100-Foot-Irrigation/dp/B001G2AMU4/ref=sr_1_5?s=lawn-garden&ie=UTF8&qid=1480958333&sr=1-5&keywords=1+2+inch+irrigation+tubing

https://www.amazon.com/Rain-Bird-T22-100S-Irrigation-Distribution/dp/B0019THNCE/ref=sr_1_1?s=hi&ie=UTF8&qid=1480958438&sr=1-1&keywords=1%2F4+inch+drip+irrigation+tube

Design

towers structure..png

Pictures

tower front view.jpg

Tower Side View.jpg